What DPI should you scan old photos at?
The honest answer depends on the size of the print, not on a single magic number. Here is the resolution for each case, plus the colour mode, bit depth, file format and automatic filters that decide whether a scan is worth keeping at all.
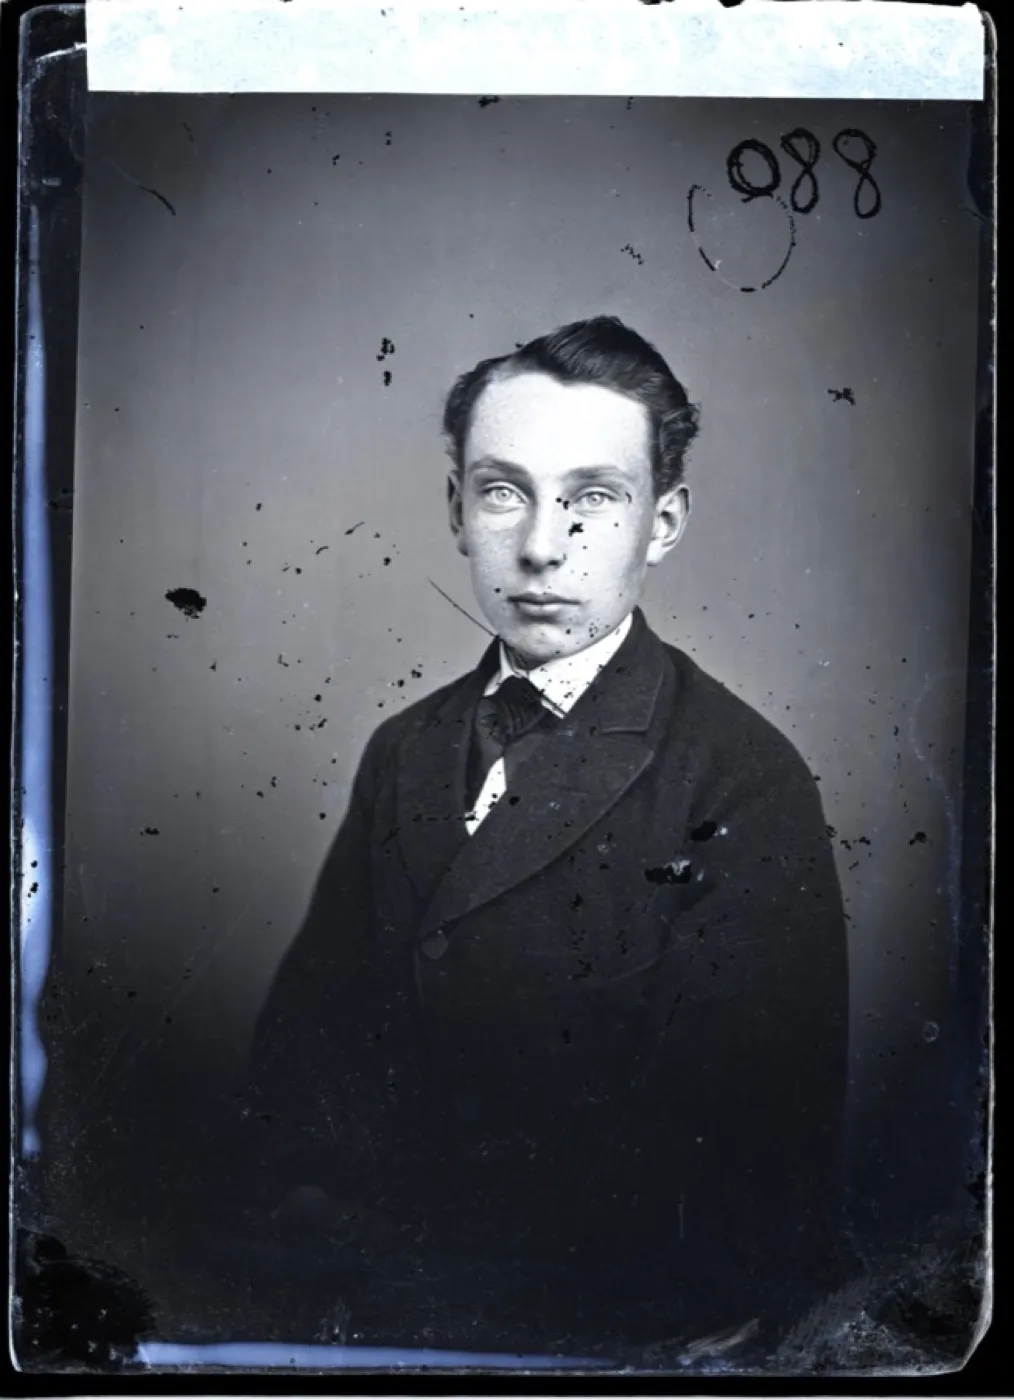 Before
 After
AfterThe same plate at a 300 DPI scan of a small print, then restored
The claim this whole page rests on is that the scan is the ceiling on the repair. This is the low half of the test: one glass plate sampled down to what a 300 DPI scan of a wallet-sized print would hold, then the app's Restore control run on it once. If this result and the one below it are indistinguishable, this page is wrong and will say so.
Given less to work from, the control invented more. It came back warmly colourised, the skin smoothly modelled, the eyes and the mouth redrawn with more confidence than the input supports. It is a handsome photograph of a man who looks a little like the sitter.
- Source
- Andreas Martinus Olesen, glass plate portrait
- Holder and licence
- Wikimedia Commons, public domain, copyright expired
- Control used
- Restore
- Model it called
- flux-kontext-apps/restore-image on Replicate
- Elapsed
- 6.6 seconds
- Output size
- 880 x 1184 px
- Captured
- 17 Sep 2026
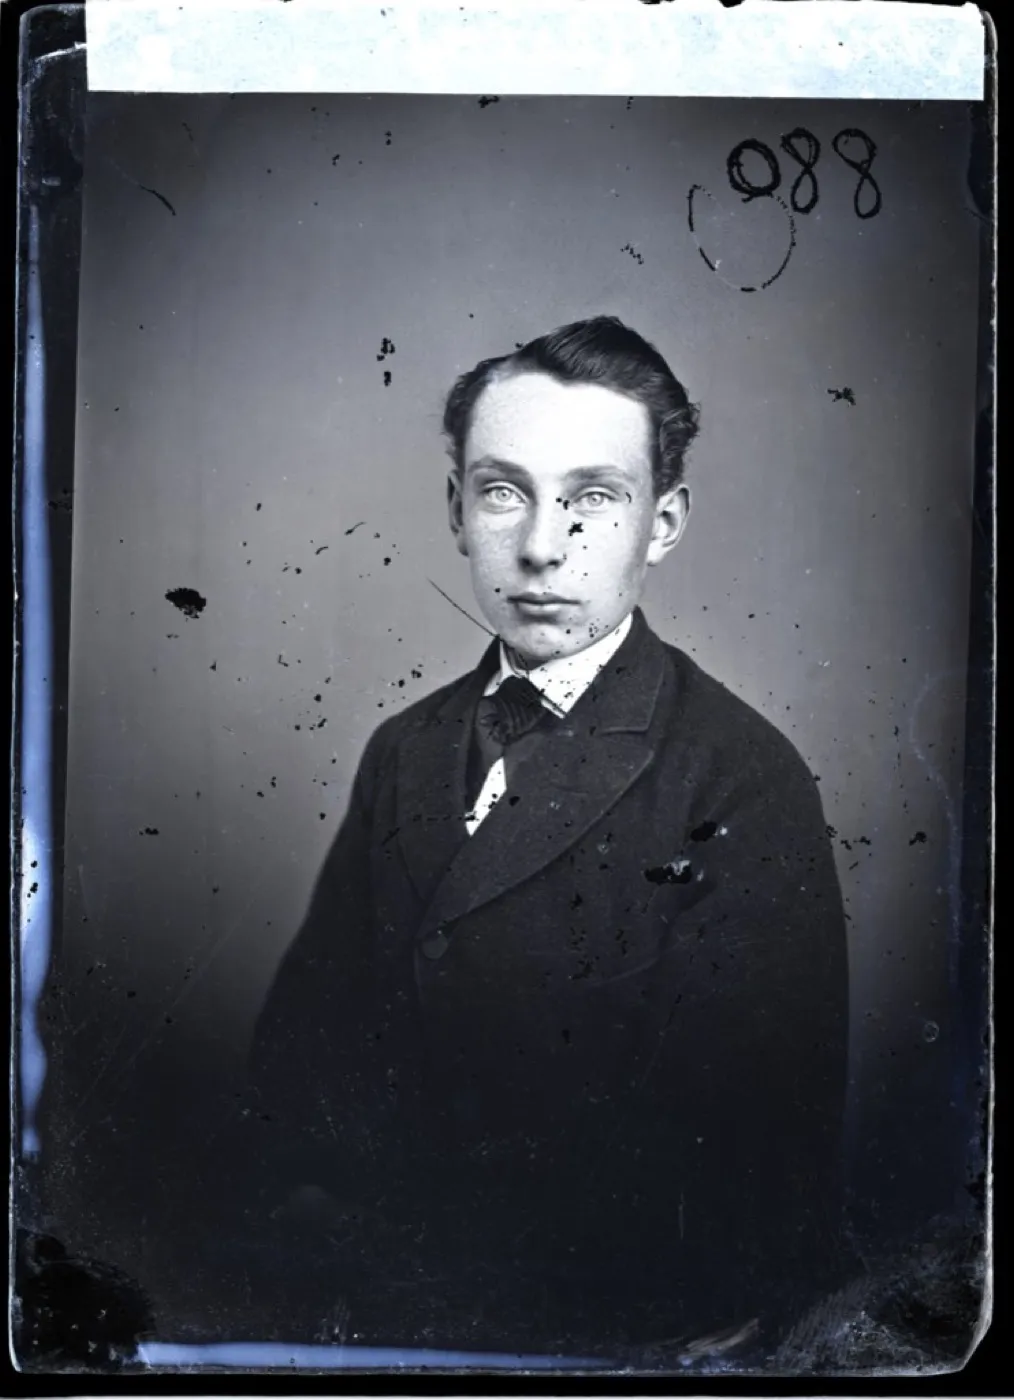 Before
 After
AfterThe same plate at a 600 DPI scan, then restored
The high half of the same test: the identical plate sampled to what a 600 DPI scan of that print would hold, then the identical control run on it once, the same afternoon, on the same account.
Not indistinguishable, which is what this page needed to find out. Same plate, same control, same day, and the higher resolution scan came back close to monochrome, with the collar, the tie and the line of the jaw following the plate instead of improving on it. The scan decided how much the model had to invent. That is the argument of this whole page, and it is the reason to spend the extra minutes at the scanner once rather than the rest of your life with a nearly right photograph.
- Source
- Andreas Martinus Olesen, glass plate portrait
- Holder and licence
- Wikimedia Commons, public domain, copyright expired
- Control used
- Restore
- Model it called
- flux-kontext-apps/restore-image on Replicate
- Elapsed
- 7.5 seconds
- Output size
- 880 x 1184 px
- Captured
- 17 Sep 2026
Every guide gives you a different number, which is a good sign that no single number is right. The correct resolution depends on how big the print is, and on one question most advice skips: is this your only pass through the collection?
If you are scanning four hundred photographs from a box in the garage, you are not going to do it twice. That changes the answer.
Resolution is also only half of the decision. The same scanner dialog that asks for a DPI figure asks for a colour mode, a bit depth, a file format and a handful of automatic filters, and several of those are harder to undo than a resolution you set slightly too low. So this page covers both halves: the number, and every other setting worth touching before you start.
The short version
| What you are scanning | Scan at |
|---|---|
| Standard 4x6 or 5x7 snapshots | 600 DPI |
| Small prints, wallet size, contact prints | 1200 DPI |
| Large prints, 8x10 and above | 600 DPI, 800 if the detail is fine |
| Anything you may enlarge or print bigger | 1200 DPI |
| A whole collection, one pass only | 600 DPI minimum |
Archivists generally settle on 600 DPI as the floor for anything worth keeping, and up to 1200 where the original is small. The reasoning is simple: you can always save a smaller copy later, but you cannot add quality that was never captured. If you want the figure worked out for the exact print in front of you, the scan DPI calculator does it by print size and intended output, and the scan settings picker shows what each common size and resolution pairing actually produces.
And the settings that go with it, which the rest of this guide explains:
| Setting | What to use |
|---|---|
| Colour mode | Colour, including for black and white prints |
| Bit depth | 24 bit, 48 bit for faded or colour-shifted prints |
| File format | TIFF for the master, JPEG for copies |
| Automatic colour restoration | Off |
| Dust and scratch removal | Off |
| Descreen | Off, unless the original was printed in a book or newspaper |
| Sharpening | Off |
| Exposure | Set by eye once, then locked for the whole batch |
Why 300 DPI keeps getting recommended, and when it is wrong
300 DPI is the print industry’s standard for reproduction at the same size. If your 4x6 snapshot will only ever be viewed on a screen or reprinted as a 4x6, then 300 is genuinely enough and anyone telling you otherwise is selling something.
It becomes wrong the moment any of these apply:
- The print is small. A wallet photograph at 300 DPI yields an image barely a thousand pixels wide. There is nothing to work with.
- You want to enlarge. Scanning a 4x6 at 600 DPI gives you enough pixels for a decent A4 print. At 300 you do not.
- You want restoration work done. Repair tools, AI or otherwise, work with what you give them. Fine scratches and grain need resolution to be distinguished from detail.
- This is your archival master. In twenty years the tools will be far better than today’s. The scan is what they will have to work from.
What actually limits your scan
Beyond a certain point you are photographing paper texture rather than the image, because a photographic print holds only so much detail. For most consumer snapshots that ceiling sits somewhere between 600 and 1200 DPI. Scanning a 1970s colour snapshot at 4800 DPI produces an enormous file that shows you the grain of the paper in exquisite detail and tells you nothing more about your grandmother’s face.
Negatives and slides are the exception. They are far smaller and far denser, so 2400 to 4000 DPI is normal and worthwhile for those.
The settings that matter more than DPI
Open the scanner software for the first time and it offers a dozen toggles with reassuring names: auto dust removal, colour restoration, descreen, sharpening, auto exposure. Most of them are on by default, because for someone scanning a receipt they save a step. For an old photograph they are the opposite of helpful, because each one makes an irreversible decision about your image before you have even seen it.
This is where a scan is usually won or lost. A scan you can trust is worth redoing at a higher resolution later if you decide you need it. A scan where the software has already baked in a wrong guess about colour is not something a higher DPI fixes.
The four settings that should stay off
Automatic colour restoration, sometimes called “restore faded colour.” This is the one that causes the most quiet damage. It looks at a faded print, guesses what the original colours probably were, and applies that guess before the file ever reaches your computer. You get one shot at the scan and the software has already spent it on a guess you cannot inspect or undo. Correct fading afterwards, in an editor, where every adjustment is visible and reversible. Our guide to why old photos turn orange covers what is actually happening to the dyes, which is worth understanding before you correct for it.
Dust and scratch removal. Hardware-level dust removal works by softening the image wherever it detects a discontinuity, and that includes fine scratches, film grain, and genuine detail in hair, fabric and eyes. It cannot tell a speck of dust from a strand of hair photographed at the same scale. The result is a scan that looks faintly smoothed everywhere, not just where the dust was. Clean the glass and the print instead, then handle the rare leftover speck afterwards with a spot-heal tool that only touches the pixels you point it at.
Descreen. This filter exists for scanning printed halftone images, magazine pages and newspaper photographs, where a pattern of ink dots needs blurring into a smooth tone. A real photographic print has no dot pattern, so descreen has nothing correct to do and softens the image anyway. Leave it off unless the thing on the glass was genuinely printed in a book or a newspaper.
Sharpening. Scanner software sharpens by increasing contrast at edges, and it cannot tell a meaningful edge in a face from a scratch, a paper fibre or a compression artefact from an earlier scan. Sharpening at capture time also compounds: if you sharpen again later, which most people do, the edges start to look artificial. Capture soft and true, then sharpen once, deliberately, at the end if the result still needs it.
Colour mode: scan black and white prints in colour as well
Most scanning software puts this choice right at the top, before resolution and before file format: colour, greyscale, or black and white line art. For a print that already looks monochrome, greyscale seems like the obvious match. It is the wrong choice, and it is one of the few scanning decisions you cannot revisit afterwards.
Nothing about an aged photographic print is truly black, white and shades of grey. The paper has usually shifted towards cream, amber or brown over the decades. Many prints carry silvering, a metallic sheen in the darkest areas where silver in the emulsion has migrated to the surface, and silvering reads as a bluish or bronze cast depending on the angle of light. Foxing spots, water stains and uneven fading all show up as colour shifts, not merely as changes in brightness.
A greyscale setting cannot see any of that. It reduces every pixel to a single brightness value at the instant of capture, and the tone, the staining and the silvering collapse into greys that may or may not resemble what was on the page. A colour scan records three channels for every pixel instead of one, and that gap is permanent the moment the scan finishes.
The extra information earns its keep in two places.
Restoration and repair work. Removing foxing, correcting uneven fading, or lifting a weak print back towards its original contrast all depend on software being able to separate a stain from the image beneath it. A stain and the photograph often sit in a similar range of grey brightness but a different colour, so a colour scan hands a repair tool something to work with that a greyscale scan has already discarded.
Honest archival value. The point of an archival scan is to record what the object actually looked like, not a processed interpretation of it. A print with a warm sepia cast and visible foxing is a specific physical object with a specific history. A file that has already decided the print should be neutral grey has quietly edited that history before anyone asked it to.
Be careful with presets here. A mode called something like “black and white photo” may force greyscale capture underneath the friendly name, so check what the saved file actually contains if you are not sure.
What a colour scan of a monochrome print does not do
Scanning in colour does not make the print look like a colour photograph, and it does not invent colour that was never recorded. It records what is on the paper, which for most black and white prints is a narrow range of warm and cool greys rather than a flat neutral scale. Open the file and at first glance it often looks much like a greyscale scan would have, with a faint warmth to it. The difference only becomes obvious when you need to correct something, which is exactly when you want it to be there.
If you want a clean neutral black and white image for viewing or sharing, that is a one second conversion from the colour master, made with the original data intact and saved as a separate copy. The reverse conversion does not exist. There is nothing left to recover it from.
What colour costs, and what to do if you already scanned in greyscale
Colour roughly triples the file size against greyscale, because you are storing three channels instead of one. For a single 4x6 print at a sensible archival setting that is the difference between a few megabytes and a little over ten. Run the numbers for your own collection with the photo scan pixels tool before you decide it is a problem.
Storage is the cheapest part of this project. The scanning time, the sorting and the labelling are the real cost, and none of them change based on which mode you tick. There is no good reason to save a little disk space at the price of information you can never capture again.
If you have already scanned a collection in greyscale, those files are still useful and the work was not wasted. The paper tone, the foxing and any silvering are simply gone from them. Where the originals still exist, rescan the ones that matter most in colour: the faces, and anything with visible fading, staining or silvering, because those are the cases where greyscale threw away the most. The rest can stay as they are if going through the whole box again is not realistic.
Bit depth: 24 bit for most prints, 48 bit for anything faded
Higher bit depth gives you more tonal steps to work with when you correct colour or pull detail out of a dark area. For a print in good condition that you mainly want to preserve, 24 bit is genuinely enough. For a badly faded or orange-shifted print you intend to correct properly, 48 bit gives an editor more to work with before banding appears in a sky or across a face. The cost is a larger file, which matters when you are scanning hundreds of prints in one sitting.
Exposure: set it once, then leave it for the whole batch
Auto exposure looks tempting because it adjusts per image, but that means every print in a batch gets a slightly different correction, which makes them inconsistent to compare later and to correct in bulk. Pick a manual exposure that looks right across a handful of representative prints, lock it, and scan the batch the same way. Consistency now saves you from guessing later which prints were scanned dark on purpose and which were simply scanned wrong.
File format: TIFF for the master, JPEG for copies
This is less a scanner setting than the output choice the dialog makes you commit to before you start. JPEG discards data every time the file is saved, and an archival master gets opened and saved repeatedly over its life. TIFF preserves everything the scanner captured. Export JPEG copies from the TIFF for sharing or printing, and never let a JPEG be the only copy of anything.
Clean the glass, and clean the print gently
A soft dry brush for the print, a microfibre cloth for the glass. Every speck you leave becomes a permanent feature of your archival master, and removing dust digitally is tedious work you can avoid in ten seconds. This is also the step that makes it easy to leave the hardware dust removal switched off, because most of the dust is no longer there.
Brushing is the limit. Water, solvents and rubbing all attack the image layer, and the damage they cause is not something any later correction undoes.
A default recipe for a whole box of photographs
If you want one combination to commit to before starting a large batch: 600 DPI, colour mode on, 24 bit unless the print is badly faded, every automatic filter off, exposure set manually once and left alone, saved as TIFF. That captures what the print actually contains rather than what the software guesses it should look like, and it is the only version of the file you can correct with confidence later, when the tools are better than they are today.
Doing a whole collection without giving up
The real failure mode is not resolution, it is abandonment. Four hundred photographs at 1200 DPI with careful individual handling is a project that dies in week two.
A workable approach: 600 DPI, batch scanning several prints per pass on the flatbed, naming as you go. Then pick out the twenty photographs that genuinely matter, the ones with faces you love, and rescan those at 1200 with proper care. A collection scanned imperfectly is infinitely more use than a perfect collection nobody finished.
Whatever you choose, write it down. Six months into a large collection you will not remember what settings you used in January, and consistency matters more than perfection.
Where phone scanning fits
Phone apps have become genuinely decent, and for a quick share of a snapshot they are fine. For an archival pass they are not, because a phone introduces lens distortion, uneven lighting, reflections off the print surface, and no reliable resolution figure.
Use a phone when the print is too large or too brittle for a flatbed, or when you are triaging a collection to decide what deserves a proper scan. Use a flatbed for anything you are keeping. The full comparison is in scan or photograph old photos, and if a phone is what you have, scanning old photos with your phone covers how to do it as well as it can be done.
When the print itself is the problem, not the settings
No scanner setting fixes fading that has already happened to the print, and none of them undo yellowing or discolouration either. What the right settings do is capture what is actually there as faithfully as possible, so that whatever correction happens next starts from real information rather than from a guess the scanner made on your behalf. If the print in front of you has gone significantly yellow or faded, our guide on faded and darkened photographs covers what an honest correction can and cannot recover, separately from anything the scanner should be doing.
Common questions
- Is 300 DPI enough for scanning old photos?
- For a standard 4x6 snapshot you only intend to view on screen or reprint at the same size, 300 DPI is adequate. It is not enough if the print is small, if you may want to enlarge it, or if this is your one archival pass through a collection. Scanning is the expensive part in time, and you cannot add detail back later without doing it all again.
- Should I scan at 1200 DPI to be safe?
- For small prints and anything wallet-sized, yes. For a whole album of standard snapshots it produces very large files for detail the print does not physically contain, and it slows the job enough that people abandon it. 600 DPI is the sensible default for most collections, with 1200 reserved for small or precious originals.
- Should I scan black and white photos in colour mode?
- Yes, every time, even though the print looks monochrome. An aged black and white print is never neutral: the paper has usually shifted towards cream or amber, and silvering, foxing and staining exist only as colour information. Colour mode records all of it and gives restoration tools considerably more to work with. You can convert to greyscale afterwards in seconds. You cannot recover tonal data you never captured.
- Does scanning in colour make the photo look better?
- Not automatically, and that is not really the point. A colour scan of a black and white print often looks close to a greyscale one at first glance, warmer if anything. The value is in what the file contains rather than how it looks on first opening, and it only shows up on the day the photograph needs real correction.
- Will a colour scan take up much more storage space?
- Roughly three times the size of the same image scanned in greyscale, because you are storing three colour channels instead of one. On a modern drive that is a rounding error next to the hours the scanning itself takes. Storage is the cheapest part of the whole project and the only part you can buy your way out of.
- What if I already scanned a whole collection in greyscale?
- Those scans are still useful and not wasted, but the paper tone, the foxing and any silvering are gone from them for good. If the originals still exist, rescan the ones that matter most, the faces and the prints with visible damage, in colour. The rest can stay as they are if going through the whole box again is not realistic.
- Should I use my scanner's automatic photo restoration setting?
- No, not for anything you intend to work on afterwards. It bakes a single guess about colour and sharpness into your only master file, and you cannot undo it later. Turn it off, scan flat, and make every correction in an editor where each step is reversible.
- Should dust and scratch removal be turned on when scanning?
- Turn it off. Hardware dust removal softens the whole image to erase specks, which costs you real detail everywhere, not just where the dust was. Clean the glass and the print instead, and deal with the odd remaining speck afterwards in an editor, where you can fix it without a blanket softening pass.
- What bit depth should I scan old photographs at?
- 48 bit colour if your scanner offers it and the print is faded, has a heavy colour shift, or is going to see real editing. For a print in reasonable condition that you are scanning mostly to keep, 24 bit is enough and produces a smaller file. The extra headroom in 48 bit only matters once you start pulling detail out of shadows or correcting a strong cast.
- JPEG or TIFF for scanned photographs?
- TIFF for the archival master, because JPEG discards information every time it saves and you are likely to edit these files repeatedly. Keep the TIFF untouched and work on JPEG or PNG copies. Storage is cheap now in a way it was not when most scanning advice was written.