Can a torn photo be repaired?
How to repair a torn photo and missing corners
A tear is the damage people panic about most and, in the end, one of the most repairable. The picture is usually still there. It has been separated into two pieces.
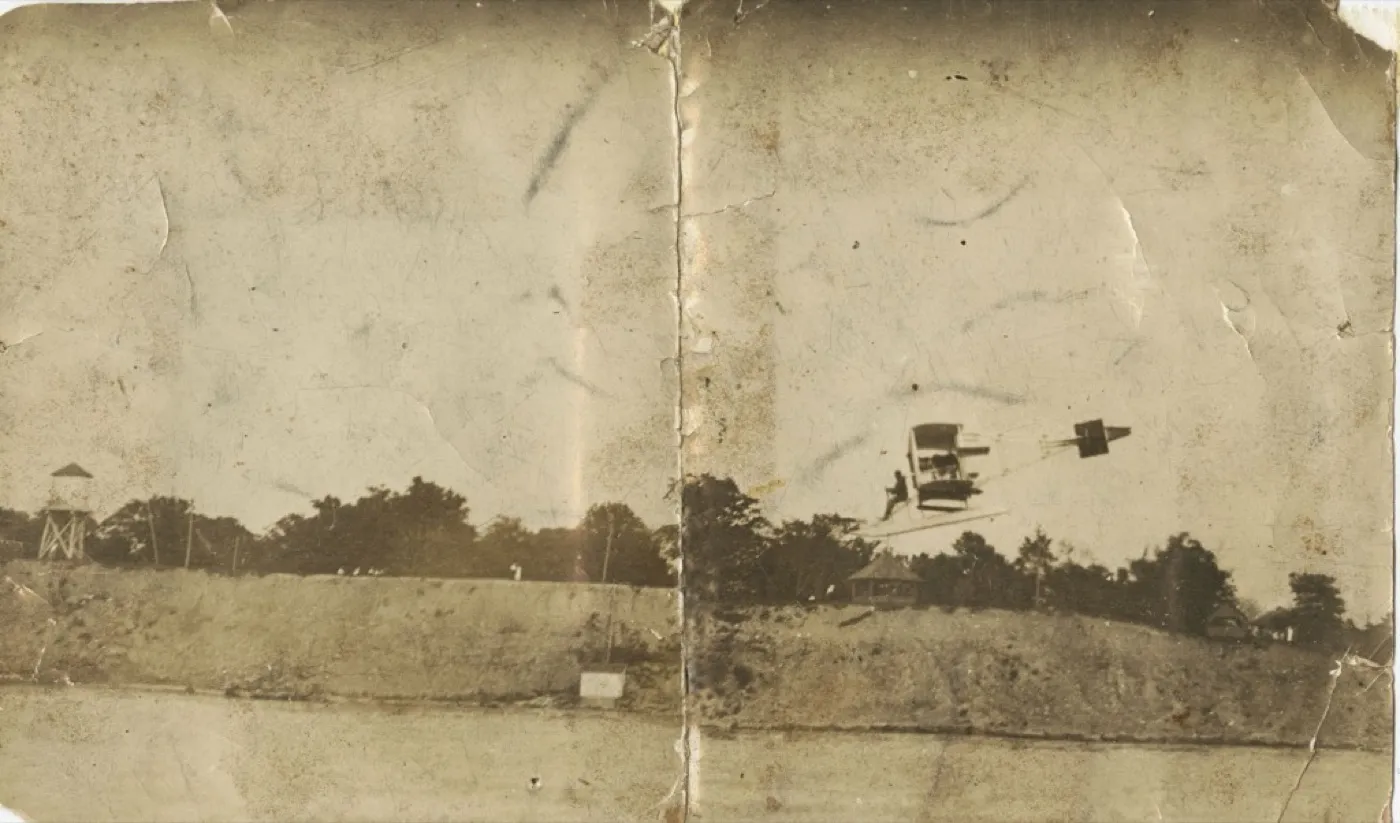 Before
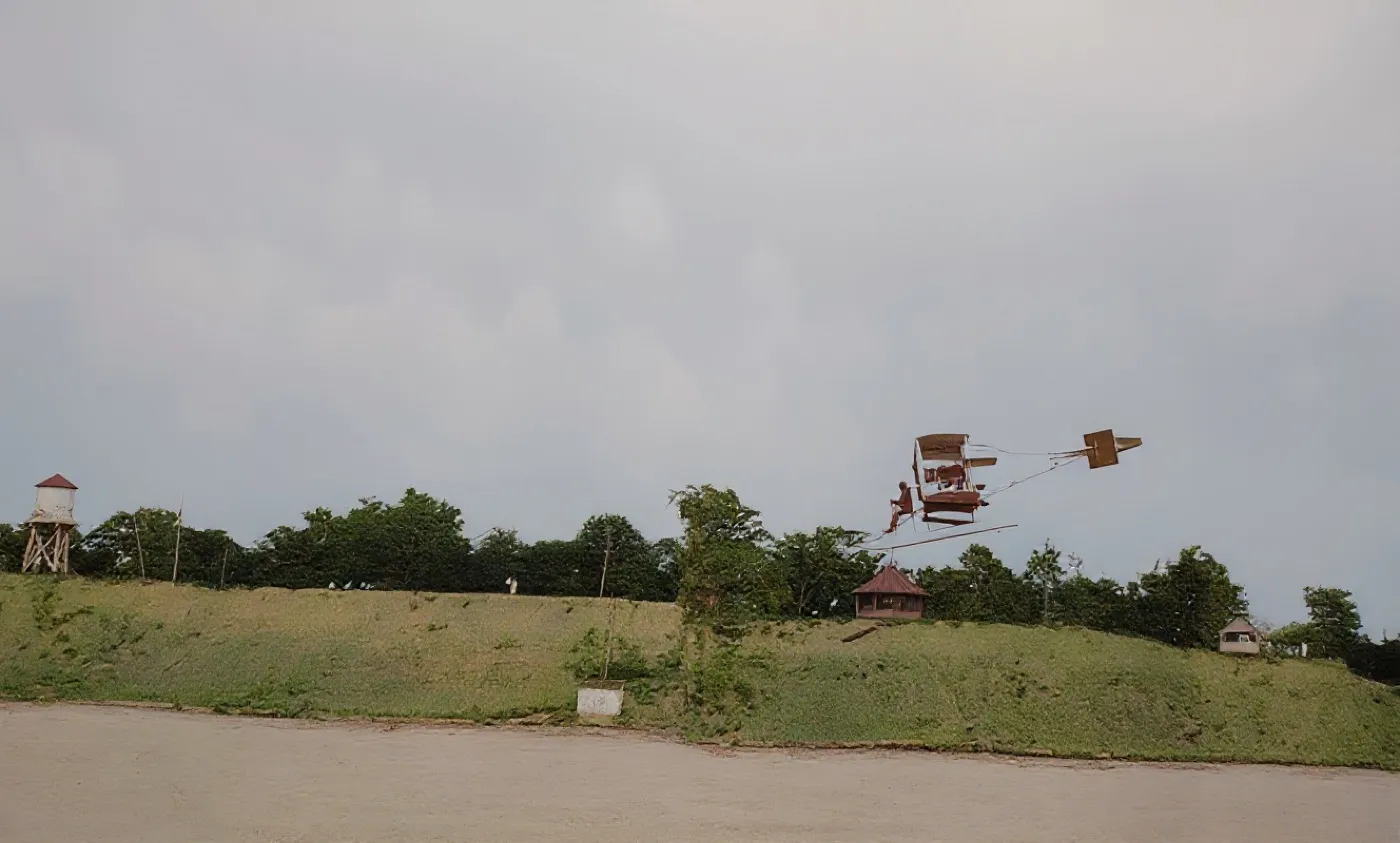 What came back
A 1912 print folded into quarters, with the creases worn through
Folds are tears in slow motion: the paper is cracked along the line and the image layer has powdered off it. The frame should show which creases close invisibly and which leave a filled band.
The fold lines close cleanly, and that is the only part of this that worked. Everything else moved. The aeroplane is redrawn into something that never flew, the water tower is rebuilt, the treeline is reseeded and the whole photograph comes back as a modern colour frame of a place that is not the place. On a print this soft and this creased there is too little left for the control to hold on to, so it invents instead of repairing. A torn print is the case to scan at high resolution and hand to a person.
- Source
- Airplane, 1912, Digital Public Library of America
- Holder and licence
- Wikimedia Commons, public domain
- Control used
- Restore
- Model it called
- flux-kontext-apps/restore-image on Replicate
- Elapsed
- 6.7 seconds
- Output size
- 1328 x 800 px
- Captured
- 17 Sep 2026

What this damage is
Almost all of the harm done to torn photographs happens in the first ten minutes, by someone trying to help. Sticky tape yellows and its adhesive soaks into the paper fibres over years, so removing it later lifts the image layer with it. Trimming the ragged edges throws away the fibres that carry the detail a repair needs to line the halves up. Glue is never the answer.
A clean split where the two pieces still meet is a different problem from a tear where paper is gone. In the first case the picture survives on both sides of the line. In the second there is a strip of photograph that no longer exists anywhere, and whatever appears there afterwards was composed rather than recovered.
Can it be fixed?
Scan the pieces together, face down on the glass with the edges touching as closely as you can manage, and let the closed lid hold them flat. No tape. Scan at 600 DPI or higher, 1200 if the print is small, and save a TIFF or PNG master rather than a JPEG, because you are about to save this file repeatedly. The repair then runs on a copy: align, fill the gap, and even out the tone last so both halves shift together. Narrow tears close convincingly. Wide ones through a face are the hardest case on this site.
Before anything else, do no harm
- No sticky tape. It is the single most common mistake, and the one that turns a repairable print into a damaged one.
- No trimming. Ragged edges carry image detail that helps a repair align the pieces.
- No glue, ever.
- Wash and dry your hands and hold the print by its edges. Skin oils etch into an emulsion faster than people expect.
- If the print is in several pieces, lay them in a paper envelope rather than a plastic sleeve. Plastic traps moisture against the surface.
Closing the tear, in order
Align the pieces. If the halves scanned as one image with a visible seam you can skip ahead. If you scanned them separately, layer them and rotate until the seam lines up on something recognisable: a doorframe, a hemline, a horizon.
Fill the gap. The white line where paper is missing has to be replaced with plausible detail. A clone stamp copies from nearby, which works beautifully across sky, wall and fabric and poorly across a face. Model based repair tends to do better on complex areas because it rebuilds from what it has learned about photographs generally rather than copying neighbouring pixels.
Even out the tone last, once the picture is whole, so both halves shift together. Tears usually arrive with age: a slight colour shift on one piece, grubby edges on the other.
Where each approach falls down
- Manual repair in a desktop editor gives the most control and the best result on a difficult image, and costs real skill and often an hour per photograph.
- Automatic repair is far faster and now genuinely good, and it will smooth fine detail and confidently invent across a face. Always compare against the original at full size.
- A professional restorer is the right answer for a handful of truly irreplaceable prints, at roughly A$40 to A$150 each.
- Nothing recovers what is not there. Where a piece is missing entirely, every tool is guessing. A good guess, but a guess.
The step people skip
Print the result and store the original properly. A restored file on a phone that gets lost in two years has not really been saved. Keep the master scan in two places, and put the original print flat in an acid free envelope away from heat and daylight.
Where the repair stops
A tear where paper is missing leaves a strip of photograph that exists nowhere. Filling it is composition, not recovery, and the wider the strip the more of the finished picture was written rather than found. Where that strip crosses a face, treat the result as a keepsake rather than a record.
Before any repair, get a proper scan: the DPI advisor gives the right setting in two questions, and the scanning guide covers the craft.
This page absorbed the torn photograph guide, merged here on 16 Sep 2026. Nothing was deleted: the old address now leads here.
One creased and torn print with a fold running through the subject, run through three tools on the same day.
Photo Restore
Our own app, the Restore control
- Elapsed
- Awaiting the run
- Verdict
- Not written yet
Pending a run: every restoration is billed to a hosted model, so it needs sign-off.
MyHeritage Photo Enhancer
Free tier, with In Color
- Elapsed
- Awaiting the run
- Verdict
- Not written yet
Pending the chairman: the free tier will not release a result without an account.
Remini
Free tier, the enhance preset
- Elapsed
- Awaiting the run
- Verdict
- Not written yet
Pending the chairman: the free tier is an app install behind a sign-in.
When these three frames exist, this bench will say plainly what each tool beats us at. A comparison that only ever finds us in front is an advert, and we have said so on the about page since July.
Five things to do to the original, in this order
- No tape, no glue, no trimming. In that order of importance.
- Wash and dry your hands, and hold the pieces by their edges.
- Lay the pieces in a paper envelope, never a plastic sleeve.
- Assemble them face down on the scanner glass and let the lid hold them flat.
- Scan at 600 DPI or higher and save a TIFF master before any repair.
Common questions
- Should I tape a torn photo back together?
- No. Sticky tape yellows, its adhesive migrates into the paper fibres, and removing it later takes emulsion with it. If you need to hold pieces together for scanning, position them on the scanner bed and let the lid provide the pressure, or use a strip of archival paper tape on the back only, never the image side.
- Can a photo torn straight through a face be repaired?
- Usually yes, though it is the hardest case. Where the tear crosses skin or an eye, the repair has to invent detail rather than copy it from nearby. Expect a good result rather than a perfect one, and keep the scan of the original so a better tool can try again in a few years.
- Is it better to scan or photograph a torn print?
- Scan whenever you can, at 600 DPI or higher. A flatbed holds the pieces flat, lights them evenly and avoids the lens distortion and reflections a phone photo introduces. Photograph it only when the print is too brittle or too large for the scanner.
- Do I need to trim the ragged edges before scanning?
- No, and you should not. Those fibres carry image detail that helps the repair align the two halves. Trimming makes the gap wider and the reconstruction larger.
The damage is the before. You hold the after.
Real repairs on real photographs. Your family's copies deserve the same rescue.